Introduction
For many purposes, it is been a while since I wanted to have a NAT64 gateway inside my LAN. Sadly, at the time of this writing, my home router does not propose that kind of service. So why not trying to run it on a Raspberry Pi ?
NAT64 gateway is mainly used to reach IPv4 network from IPv6 network. There are many possible applications, such as opening an IPv6 access to a server farm that was only designed to operate through IPv4, or giving an access to IPv4 Internet for hosts only having an IPv6 configuration.
This article describes how to configure a Raspberry Pi as a working NAT64 gateway with the help of the Tayga software.
Table of contents
Disclaimers
Disclaimer 1: If you are not using a Debian Linux (or Raspbian) nor installing Tayga through aptitude software, I could not guarantee that you will match the same conditions that I have encountered.
Disclaimer 2: This article only focus on NAT64 and Tayga. Topics as DNS64, Router Advertisement, or firewall are voluntary avoided and would be explored through future articles.
Situation
Hardware and software used
- Router: Mikrotik hEX S model RB760iGS with firmware 6.47.1.
- Switch: unmanaged NETGEAR GS108 switch
- Raspberry Pi: model 4B with 4 gigabytes of ram, a quad-core CPU, and with Raspbian 10.4.
- NAT64 software: Tayga 0.9.2-8
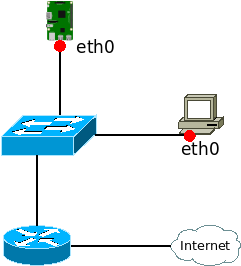
Network topology
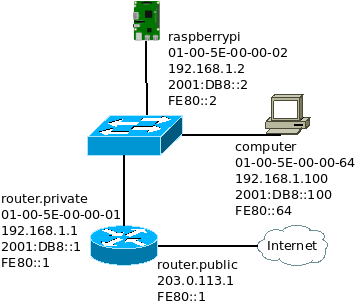
Here is a simplified representation of the LAN used. This is a really common dual stack LAN that could be found at any home. The default gateway is the router for both IPv4 and IPv6. Everything has access to Internet through IPv4 and IPV6. The router provide an Internet access through a NAT44 gateway because the Internet service provider provides only a single IPv4 address. Every hosts have a public IPv6 address because the Internet service provider provides a /64 IPv6 prefix.
The Raspberry Pi is not directly connected to the router simply because there are only two interfaces on this router model. It would have been more practical to have it directly attached to the router but a router with more than 2 interfaces is pretty expensive for a home usage.
What does the software Tayga ?
This software has one major purpose: converting incoming packet from IPv6 to IPv4 or from IPv4 to IPv6.
To achieve this goals, Tayga uses a Linux kernel feature called TUN devices. The principle of a TUN device is to link a Virtual Network Interface (VNI) to a file descriptor. On the file descriptor side, an application can make raw communication with the network world. And on the VNI side, the kernel can exchange packets between the VNI and the other network interfaces.
For the understanding of the rest of this article, it is important to realize that a TUN device has two ends:
- The VNI that appears on the interface list and is used by the kernel to exchange data between Tayga and the other network interfaces
- The file descriptor that is used by Tayga to exchange data with the kernel

From a Kernel point of view, a TUN device could be represented like this:
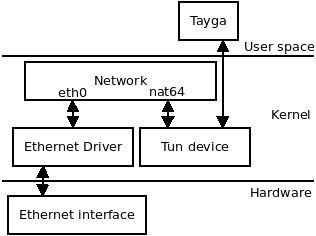
In terms of OSI model, Tayga interacts with two layers: the network layer and the transport layer.
At the network layer, Tayga only manages IPv4 and IPv6 protocols, if something manages to send another network protocol inside the VNI, it is dropped. (see function read_from_tun in file tayga.c)
At the transport layer, Tayga manages ICMPv4 if network layer is IPv4, ICMPv6 if network layer is IPv6, TCP with both network layers, and UDP with both network layers too. If the payload is something else, it is just copied from IPv4 to IPv6 payload or from IPv6 to IPv4 payload. (see functions xlate_payload_6to4 or xlate_payload_4to6 in file nat64.c)
Tayga addressing scheme
To operate properly, Tayga needs four things: an IPv6 prefix, an IPv4 pool, an IPv6 address and an IPv4 address.
The IPv4 pool
This pool is used to map IPv6 source addresses from the LAN to IPv4 addresses. It is better to pick a different subnet than any subnet used in the LAN. And the pool must be big enough to be mapped to every host in the LAN.
The default configuration of the Debian package comes with the following pre defined pool: 192.168.255.0/24
This subnet is different than any subnet used in the LAN and allow 254 mapping, that is more than enough, so let’s use it!
The IPv4 address
For control purpose, and more precisely error management, Tayga must be able to send ICMPv4 packet. To do so, it needs an IPv4 source address. The default configuration coming with the Debian package suggests the use of the address 192.168.255.1. Even if this address is included in the IPv4 pool, it is allowed to use it. This address will be removed from the pool and won’t be used for any translation. The pool size has now a length of 253, still more than enough.
The IPv6 prefix
The IPv6 prefix is the most interesting part because it embeds the IPv4 destination address to translate. And Tayga needs to know from which prefix it has to extract IPv4 addresses.
Because an IPv4 address is 32-bit long, the IPv6 prefix can not be bigger than 96 bits. (an IPv6 address of 128 bits minus an IPv4 address of 32 bits is equal to 96 bits) Tayga follows the rules defined by RFC 6052, the prefix must have one of the following sizes: 32, 40, 48, 56, 64 or 96 bits.
The RFC 6052 also proposes an IPv6 prefix reserved for embedded IPv4 and NAT64 gateway: 64:ff9b::/96
It is called the Well-Known Prefix. Even if it is not mandatory to use it, why not taking that one.
The RFC 6052 comes with a set of rules and good practices that justify some of the implementation choices of Tayga. This is not the purpose of this article to talk about it, but that RFC remains an interesting reading.
The IPv6 address
The reason why Tayga needs an IPv6 address is the same as for the IPv4 address. It needs an IPv6 source address to send ICMPv6 packet in case of issue. But this address is more complicated to determine because of all the rules it has. It can not be an address from the prefix 64:ff9b::/96, not a link local address, not a multicast address, not an address from the prefix 0::/8, …
I am adding one more rule! I do not want it to be a Global Unicast Address (GUA). The reason is quite simple, the NAT44 gateway to reach Internet is managed by the router and not by Tayga. Because of that, Tayga never exchanges directly with hosts out of the LAN. It only exchanges data with LAN hosts or with the router. So there is no need to set an IPv6 that could be forwarded on Internet.
What’s left ? Unique Local Address (ULA). It is not against the rules and it is not a Global Unicast Address.
The IPv6 address of Tayga will be fdaa:bb:1::1.
Simplified use case
With all these settings defined, here is a simplified use case of how things should occur.
A packet arrives at the VNI interface with the IPv6 source address 2001:DB8::100 and the IPv6 destination address 64:ff9b::0808:0808. Tayga translates the source address to the IPv4 address 192.168.255.2 and the destination address to the IPv4 address 8.8.8.8. The payload remains mostly unchanged.

The address 192.168.255.2 is randomly picked. Let’s say it is the first available address in the IPv4 pool.
During the process, Tayga also maps the address 192.168.255.2 to 2001:DB8::100 during at least 2 hours. So if any IPv4 packet comes back, it will be sent to the correct IPv6 destination.
And the destination IPv4 address 8.8.8.8 is extracted from the IPv6 address 64:ff9b::0808:0808. Even if is not obvious, the last 32 bits of the IPv6 address 0808:0808 are the IPv4 address. Groups of 4 hexadecimal characters are used to represent an IPv6 address while the Dot Decimal Notation is used to represent an IPv4 address, this is why it does not look exactly the same, but it is the same value.
The next section describe a more complete and detailed use case.
Scenario
The test case scenario consists of sending an ICMPv6 request (ping) to Google DNS (8.8.8.8) through the NAT64 gateway and then receiving the ICMPv6 reply. The corresponding IPv6 address of the IPv4 8.8.8.8 embedded into the Well-Known IPv6 prefix is 64:ff9b::8.8.8.8, or 64:ff9b::0808:0808, or 64:ff9b::808:808.
Part 1: the ICMP request
The first part of the scenario is the ICMPv6 request being sent from a random host inside the LAN, then being converted into an ICMPv4 request, and finally being sent to Internet.
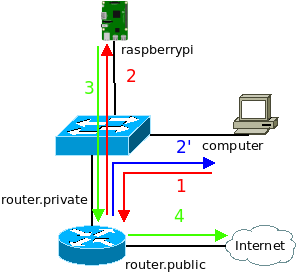
The host sends an ICMPv6 request to the router and not the Raspberry Pi because the only routing rule known by a host is the default route. That means sending every traffic not “on link” to the default gateway. Then the router sends the frame containing the ICMPv6 request to the Raspberry Pi. The Raspberry Pi converts the ICMPv6 request into an ICMPv4 request and sends it to the router. And finally the router sends the ICMPv4 request on Internet.
The router also sends an ICMPv6 redirect (type 137) telling the host it was not the best routing decision to send this ICMPv6 request to the router, it should send it directly to the Raspberry Pi. With that information, the host will send future ICMPv6 request directly to the Raspberry Pi.
The following table describes MAC addresses, IP addresses and payload used at each step:
| Step | MAC src | MAC dest | IP version | IP src | IP dest | Payload |
| 1 | 01-00-5E-00-00-64 | 01-00-5E-00-00-01 | 6 | 2001:db8::100 | 64:ff9b::808:808 | ICMP6, echo request |
| 2 | 01-00-5E-00-00-64 | 01-00-5E-00-00-02 | 6 | 2001:db8::100 | 64:ff9b::808:808 | ICMP6, echo request |
| 2′ | 01-00-5E-00-00-01 | 01-00-5E-00-00-64 | 6 | fe80::1 | 2001:db8::100 | ICMP6 redirect |
| 3 | 01-00-5E-00-00-02 | 01-00-5E-00-00-01 | 4 | 192.168.255.219 | 8.8.8.8 | ICMP echo request |
| 4 | …. | … | 4 | 203.0.113.1 | 8.8.8.8 | ICMP echo request |
Part 2: the ICMP reply
The second part of the scenario is an ICMPv4 reply coming back from Internet, being converted into an ICMPv6 reply, and being sent back to the specific host that was at the origin of the ICMPv6 request.
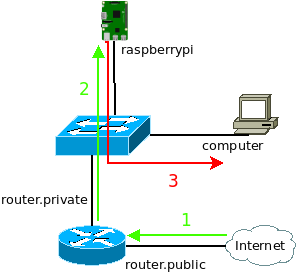
The reply path is a little bit simpler than the request path for two reasons:
- The router knows a route to the IPv4 range used by the NAT64 via the Raspberry Pi
- The Raspberry Pi replies the ICMPv6 reply to an IPv6 “on link” address and sends it directly to the host on the LAN
The following table describes MAC addresses, IP addresses and payload used at each step:
| Step | MAC src | MAC dest | IP version | IP src | IP dest | Payload |
| 1 | … | … | 4 | 8.8.8.8 | 203.0.113.1 | ICMP echo reply |
| 2 | 01-00-5E-00-00-01 | 01-00-5E-00-00-02 | 4 | 8.8.8.8 | 192.168.255.219 | ICMP echo reply |
| 3 | 01-00-5E-00-00-02 | 01-00-5E-00-00-64 | 6 | 64:ff9b::808:808 | 2001:db8::100 | ICMP6 echo reply |
Configuration
With all these informations in mind, the configuration is pretty straightforward.
On the Raspberry Pi
Step 1: installing Tayga
Install Tayga through Aptitude packet manager.
pi@raspberrypi:~$ sudo apt install tayga
Reading package lists... Done
...
Setting up tayga (0.9.2-8) ...
pi@raspberrypi:~$
Step 2: configuring Tayga, application side (file /etc/tayga.conf)
The configuration file of Tayga is located at /etc/tayga.conf.
tun-device nat64
ipv4-addr 192.168.255.1
ipv6-addr 2001:db8::2
prefix ::/96
dynamic-pool 192.168.255.0/24
data-dir /var/spool/tayga
Almost all of these settings are discussed in the Tayga Addressing Scheme section: ipv4-addr, ipv6-addr, prefix, and dynamic-pool.
The setting tun-device is the VNI interface created and used by Tayga. Except if you know what you are doing and want to do some experimentation, the best is to keep the value nat64. There is no need to manually create this interface, scripts provided with the Debian package do it for you.
The setting data-dir is a path to a directory where Tayga keeps track of dynamic mappings. So in case of a reload of Tayga or if the Raspberry Pi restarts, informations about existing mapping are resilient.
Step 3: configuring Tayga, VNI side (file /etc/default/tayga)
Another configuration file that needs to be updated is /etc/default/tayga, this is not an official Tayga configuration file, but an extra configuration file added by the packaging team. This file is used by the script /etc/init.d/tayga mainly to set the VNI side. To be precise, this is the configuration of the Linux side of the TUN device, Tayga does not read nor use that file at all. (see section explaining how Tayga works)
Here is the content of this file:
CONFIGURE_IFACE="yes"
CONFIGURE_NAT44="no"
IPV4_TUN_ADDR=""
IPV6_TUN_ADDR=""
DAEMON_OPTS=""
The setting CONFIGURE_IFACE must be kept to yes. It instructs scripts to create and set up the VNI interface defined in Tayga configuration file, see tun-device parameter. If this setting was set to no, it would have need to be done manually.
The setting CONFIGURE_NAT44 must be set to no. The authors of this script have though the service would have been use on a computer with an interface directly connected to IPv4 Internet. With this setting set to yes, these scripts automatically attempt to create a NAT44 rule in iptable. But with the current situation, the NAT44 function is assumed by the router and is not needed on the Raspberry Py.
The three last settings, DAEMON_OPTS, IPV6_TUN_ADDR, and IPV4_TUN_ADDR, are not used with the current design and must stay empty.
The setting DAEMON_OPTS allows to pass extra argument to the Tayga binary when it starts as a daemon process. Right now, only the --pidfile argument is used but there are others. For example, it is possible to increase process isolation with arguments like --user, --group, or --chroot. See Tayga manpage for more details.
The settings IPV6_TUN_ADDR and IPV4_TUN_ADDR are respectively used to assign an IPv6 address and an IPv4 address to the VNI interface. The NAT64 gateway works without them, but for more advanced and persistent configuration it is nice to have a way to assign addresses to the VNI.
Step 4: enabling ip forwarding
To allow IP packet to be exchanged between the VNI interface and the physical interface of the Raspberry Pi, forwarding must be enabled inside the Linux kernel.
Add or uncomment the following lines inside the file /etc/sysctl.conf.
net.ipv4.ip_forward = 1
net.ipv6.conf.all.forwarding = 1
And then apply the change to the kernel with the following command:
pi@raspberrypi:~ $ sudo sysctl -p
net.ipv4.ip_forward = 1
net.ipv6.conf.all.forwarding = 1
pi@raspberrypi:~ $
Step 4: starting Tayga
Tayga is now ready to be started!
pi@raspberrypi:~$ sudo systemctl start tayga.service
pi@raspberrypi:~$
Step 5: enabling Tayga
To be sure Tayga starts in case of the Raspberry Pi reboot, it needs to be enabled through systemd with the following command:
pi@raspberrypi:~$ sudo systemctl enable tayga.service
tayga.service is not a native service, redirecting to systemd-sysv-install.
Executing: /lib/systemd/systemd-sysv-install enable tayga
pi@raspberrypi:~$
The command output may look strange. This is because Tayga was designed to work with initd and not systemd. But it does not change anything in the end.
On the router
A few routing rules need to be added on the router. These are really simple rules that could be adapted for any other router brand.
Step 1: Adding a route to the IPv4 pool
[admin@MikroTik] > /ip route add dst-address=192.168.255.0/24 gateway=192.168.1.2
[admin@MikroTik] >
With 192.168.255.0/24 the IPv4 pool used by Tayga to convert IPv6 to IPv4. And 192.168.1.2 the IPv4 LAN address of the physical interface of the Raspberry Pi.
Step 2: Adding a route to the IPv6 prefix
[admin@MikroTik] > /ipv6 route add dst-address=64:ff9b::/96 gateway=fe80::2%bridge
[admin@MikroTik] >
With 64:ff9b::/96 the IPv6 prefix used to carry embedded IPv4 addresses. And fe80::2%bridge the link local address of the physical interface of the Raspberry Pi. It is needed to specify the outgoing interface bridge because of the use of a link local address and also because the Raspberry Pi is reachable through the bridge interface of the router .
No route to fdaa:bb:1::1
I choose not to add a route to fdaa:bb:1::1 inside this infrastructure, so it is not possible to reach Tayga directly through its IPv6 address. I did that for two reason:
- It reduces the configuration complexity, less to configure means a reduced risk of issue.
- It does not provide any more feature to have it, common operation does not need to reach Tayga through its IPv6.
Even if it breaks a part of the end-to-end principle, I assume that choice.
Tests
Traffic tests
For this test, traffic is captured at two points on the network: on the Raspberry Pi on the eth0 interface, and on the test computer on the eth0 interface.
Then from the test computer, an ICMPv6 request is sent with the ping tool:
user@computer:~ $ ping -6 -c 1 64:ff9b::8.8.8.8
PING 64:ff9b::8.8.8.8(64:ff9b::808:808) 56 data bytes
64 bytes from 64:ff9b::808:808: icmp_seq=1 ttl=114 time=26.3 ms

--- 64:ff9b::8.8.8.8 ping statistics ---
1 packets transmitted, 1 received, 0% packet loss, time 0ms
rtt min/avg/max/mdev = 26.288/26.288/26.288/0.000 ms
user@computer:~ $
On the Raspberry Pi at the interface eth0
pi@raspberrypi:~ $ sudo tcpdump -teni eth0 icmp or icmp6
tcpdump: verbose output suppressed, use -v or -vv for full protocol decode
listening on eth0, link-type EN10MB (Ethernet), capture size 262144 bytes
01:00:5e:00:00:64 > 01:00:5e:00:00:02, ethertype IPv6 (0x86dd), length 118: 2001:db8::100 > 64:ff9b::808:808: ICMP6, echo request, seq 1, length 64
01:00:5e:00:00:02 > 01:00:5e:00:00:01, ethertype IPv4 (0x0800), length 98: 192.168.255.219 > 8.8.8.8: ICMP echo request, id 2, seq 1, length 64
01:00:5e:00:00:01 > 01:00:5e:00:00:02, ethertype IPv4 (0x0800), length 98: 8.8.8.8 > 192.168.255.219: ICMP echo reply, id 2, seq 1, length 64
01:00:5e:00:00:02 > 01:00:5e:00:00:64, ethertype IPv6 (0x86dd), length 118: 64:ff9b::808:808 > 2001:db8::100: ICMP6, echo reply, seq 1, length 64
^C
4 packets captured
4 packets received by filter
0 packets dropped by kernel
pi@raspberrypi:~ $
The information captured on the eth0 interface are really similar to the information that could have been captured on the nat64 interface of the Raspberry Pi. The main advantage to make the capture on the eth0 interface is to get the MAC addresses used on the LAN.
On the test computer at the interface eth0
user@computer:~$ sudo tcpdump -teni eth0 icmp or icmp6
[sudo] password for djo:
tcpdump: verbose output suppressed, use -v or -vv for full protocol decode
listening on wlp5s0, link-type EN10MB (Ethernet), capture size 262144 bytes
01:00:5e:00:00:64 > 01:00:5e:00:00:01, ethertype IPv6 (0x86dd), length 118: 2001:db8::100 > 64:ff9b::808:808: ICMP6, echo request, seq 1, length 64
01:00:5e:00:00:01 > 01:00:5e:00:00:64, ethertype IPv6 (0x86dd), length 214: fe80::1 > 2001:db8::100: ICMP6, redirect, 64:ff9b::808:808 to fe80::2, length 160
01:00:5e:00:00:02 > 01:00:5e:00:00:64, ethertype IPv6 (0x86dd), length 118: 64:ff9b::808:808 > 2001:db8::100: ICMP6, echo reply, seq 1, length 64
^C
3 packets captured
3 packets received by filter
0 packets dropped by kernel
user@computer:~$
On the test computer, only two packets could have been expected: ICMPv6 echo and ICMPv6 reply. But because of the topology used, a third packet is captured, the ICMPv6 redirect. (See the scenario section)
Performance tests
Bandwidth
My Internet connexion is not really fast comparing to modern technologies. This is a good old ADSL2+ connexion with a downlink of 16Mb/s (2000KB/s) and an uplink of 1Mb/s (125KB/s). The limit of Tayga won’t be reached with that. The goal here is to check if there is any loose of bandwidth while using the NAT64 gateway. The tool iperf3 was run three times for each combination, the average values are presented in the following table:
| IPv4 | IPv6 | through NAT64 | |
| sending | 92KB/s | 92KB/s | 93KB/s |
| receiving | 1400KB/s | 1376KB/s | 1380KB/s |
The difference between each situation is marginal, so I can tell without hesitation that using the gateway has absolutely no impact on the bandwidth.
Delay
I simply use the ping command for these tests and 200 ICMP request/reply has been sent for each three cases.
| IPv4 | IPv6 | through NAT64 | |
| min | 29ms | 29ms | 29ms |
| avg | 49ms | 47ms | 47ms |
| max | 596ms | 403ms | 249ms |
| mdev | 57ms | 44ms | 37ms |
As for bandwidth, there is no significant loose of delay while using NAT64 gateway.
Raspberry Pi CPU load while testing bandwidth
It is also interesting to monitor the Raspberry Pi CPU while doing bandwidth tests. Remember that Tayga is a software, meaning its limits are the CPU and the RAM of the computer where it runs.
The ram consumption is really limited and that is why only the CPU is represented here.
| Receiving | Emitting | |
| CPU min | 10% | 0.7% |
| CPU max | 15% | 1.3% |
The huge CPU activity difference between receiving and emitting is just caused by difference of bandwidth. Receiving is almost at 1400KB/s while emitting is around 92KB/s. Tayga works way more while receiving.
The percentages presented are just for a single core of the Raspberry Pi CPU. The three other core of the CPU are not used at all by Tayga.
More performance test ?
More performance test could be done to discover where the limit of the gateway is. A more powerful Internet access is required and I don’t have one right now. It could also have been possible to exchange data between two hosts on the LAN through the NAT64 gateway, but that would required to tamper settings at different places.
The gateway clearly operate at ease with my actual Internet connexion, it is all I wanted to know.
The bottleneck is more than likely the CPU. By looking at its usage at 1400KB/s (around 10% of CPU usage), the bandwidth limit of Tayga should be around 14MB/s with that kind of hardware.
Troubleshooting
Because this kind of deployment could came with issues, here is a few debug methods.
Checking the service status
Once the service has been started, the status should be active (running), it can be checked with the following command:
pi@raspberrypi:~ $ sudo systemctl status tayga.service
● tayga.service - LSB: userspace NAT64
   Loaded: loaded (/etc/init.d/tayga; generated)
   Active: active (running) since Mon 2020-08-17 09:42:38 BST; 1 weeks 5 days ago
     Docs: man:systemd-sysv-generator(8)
    Tasks: 1 (limit: 4915)
   CGroup: /system.slice/tayga.service
           └─30744 /usr/sbin/tayga --pidfile /var/run/tayga.pid

pi@raspberrypi:~ $
If there is any error or strange ouput while retrieving the status, the next step is to check the service log.
Checking the service log
The log file can be checked at any time with the following command, even if there is no issue:
pi@raspberrypi:~ $ journalctl -xe -u tayga.service
-- Subject: A start job for unit tayga.service has begun execution
-- Defined-By: systemd
-- Support: https://www.debian.org/support
--
-- A start job for unit tayga.service has begun execution.
--
-- The job identifier is 12061.
Aug 29 11:28:11 raspberrypi4 tayga[25133]: Created persistent tun device nat64
Aug 29 11:28:11 raspberrypi4 tayga[25148]: starting TAYGA 0.9.2
Aug 29 11:28:11 raspberrypi4 tayga[25148]: Using tun device nat64 with MTU 1500
Aug 29 11:28:11 raspberrypi4 tayga[25148]: TAYGA's IPv4 address: 192.168.255.1
Aug 29 11:28:11 raspberrypi4 tayga[25148]: TAYGA's IPv6 address: fdaa:bb:1::1
Aug 29 11:28:11 raspberrypi4 tayga[25148]: NAT64 prefix: 64:ff9b::/96
Aug 29 11:28:11 raspberrypi4 tayga[25148]: Note: traffic between IPv6 hosts and private IPv4 addresses (i.e. to/from 64:ff9b::10.0.0.0/104, 64:ff9b::192.168.0.0/112, etc) will be dropped.  Use a translation prefix within your organization's IPv6 address space instead of 64:ff9b::/96 if you need your IPv6 hosts to communicate with private IPv4 addresses.
Aug 29 11:28:11 raspberrypi4 tayga[25148]: Dynamic pool: 192.168.255.0/24
Aug 29 11:28:13 raspberrypi4 tayga[25126]: Starting userspace NAT64: tayga.
Aug 29 11:28:13 raspberrypi4 systemd[1]: Started LSB: userspace NAT64.
-- Subject: A start job for unit tayga.service has finished successfully
-- Defined-By: systemd
-- Support: https://www.debian.org/support
--
-- A start job for unit tayga.service has finished successfully.
--
-- The job identifier is 12061.
pi@raspberrypi:~ $
The output presented here is the output of a normal and working situation. If any troubles were happening, the output would have been slightly different.
Any unwanted NAT44 rule on the Raspberry Pi ?
With the configuration set, no NAT44 should have been created, it is possible to confirm that with the following command:
pi@raspberrypi:~ $ sudo iptables -t nat -L POSTROUTING
Chain POSTROUTING (policy ACCEPT)
target     prot opt source               destination
pi@raspberrypi:~ $
There is no NAT44 rule in the previous output, but if the output retrieved would have look like the following, an unwanted NAT44 has been created.
pi@raspberrypi:~ $ sudo iptables -t nat -L POSTROUTING
Chain POSTROUTING (policy ACCEPT)
target     prot opt source               destination
MASQUERADE  all  --  192.168.255.0/24     anywhere
pi@raspberrypi:~ $
Check the configuration part to be sure to have disabled the NAT44 rule creation. It is also possible to remove it with the following command:
pi@raspberrypi:~ $ sudo iptables -t nat -D POSTROUTING 1
pi@raspberrypi:~ $
Be careful with the last argument of the command, it is the index of the rule to remove in the list, if there are more rules in the list, this index could need to be updated to remove the unwanted nat44 rule.
Does Tayga answer to ICMP request ?
A basic test in network science to determine if a host is operating normally is to send it an ICMP/ICMPv6 echo request. Even if Tayga is more a service than a host, it is design to answer to echo requests.
Ping its IPv4 address
Tayga has the IPv4 address 192.168.255.1 assigned in its configuration and there is a route to reach that subnet, so it should answer to it.
user@computer:~$ ping -c 4 192.168.255.1
PING 192.168.255.1 (192.168.255.1) 56(84) bytes of data.
64 bytes from 192.168.255.1: icmp_seq=1 ttl=63 time=16.1 ms
From 192.168.1.1 icmp_seq=2 Redirect Host(New nexthop: 4.1.168.192)
64 bytes from 192.168.255.1: icmp_seq=2 ttl=63 time=2.88 ms
64 bytes from 192.168.255.1: icmp_seq=3 ttl=63 time=37.6 ms

--- 192.168.255.1 ping statistics ---
3 packets transmitted, 3 received, +1 errors, 0% packet loss, time 2003ms
rtt min/avg/max/mdev = 2.880/18.860/37.648/14.332 ms
user@computer:~$
ping its IPv6 address
It is a little bit more complicated to ask Tayga to answer to an ICMPv6 request because there is no route to fdaa:bb:1::1 and because Tayga has no address defined inside the Well-Known prefix 64:ff9b::/96.
Because of the RFC 6052, Tayga does not translate IPv6 address carrying a RFC 1918 address and replies with an error. With this trick, it is possible to check if Tayga answers to IPv6 without reaching a host on Internet.
user@computer:~$ ping -c 4 64:ff9b::192.168.1.1
PING 64:ff9b::192.168.1.1(64:ff9b::c0a8:101) 56 data bytes
From fdaa:bb:1::1 icmp_seq=1 Destination unreachable: No route
From fdaa:bb:1::1 icmp_seq=2 Destination unreachable: No route
From fdaa:bb:1::1 icmp_seq=3 Destination unreachable: No route
From fdaa:bb:1::1 icmp_seq=4 Destination unreachable: No route

--- 64:ff9b::192.168.1.1 ping statistics ---
4 packets transmitted, 0 received, +4 errors, 100% packet loss, time 3005ms

user@computer:~$
The answer comes from fdaa:bb:1::1, the IPv6 address assigned to Tayga. It shows Tayga is able to exchange IPv6 traffic.
Conclusion
There is now a working NAT64 gateway in my LAN meeting all of my expectations. It wasn’t always easy to understood each part of it at first but the configuration was really short and not so difficult. Tayga seems to be a really simple, powerful and efficient tool. And now it is time to work on a DNS64 service… 🙂
Sources
- https://en.wikipedia.org/wiki/NAT64
- https://en.wikipedia.org/wiki/Internet_Control_Message_Protocol
- https://en.wikipedia.org/wiki/Internet_Control_Message_Protocol_for_IPv6
- http://www.litech.org/tayga/
- https://packages.debian.org/sid/tayga
- https://manpages.debian.org/buster/tayga/tayga.8.en.html
- https://manpages.debian.org/buster/tayga/tayga.conf.5.en.html
- https://github.com/openthread/tayga
- https://tools.ietf.org/html/rfc3849
- https://tools.ietf.org/html/rfc4291
- https://tools.ietf.org/html/rfc5342
- https://tools.ietf.org/html/rfc5737
- https://tools.ietf.org/html/rfc6052
- https://thepoulpe.net/index.php?article25/mise-en-place-d-un-reseau-ipv6-troisieme-partie
- https://github.com/openthread/ot-br-posix/pull/177/files
- https://www.cisco.com/c/en/us/support/docs/ios-nx-os-software/nx-os-software/213841-understanding-icmp-redirect-messages.html
- https://floating.io/2016/05/tuntap-demystified/
- https://www.kernel.org/doc/Documentation/networking/tuntap.txt
Thanks for this post. I am trying to figure out the equivalent standard linux ip route commands for the the mikrotik routes that you have as I think that is where my problem lies (since I have a tomato firmware based router)