There is a Pi-hole DNS inside my home network since a while, it is a really powerful add blocker system. While I was looking for a DNS64 solution, I discovered Pi-hole did not have a DNS64 option. At first, I was afraid to have to choose between the Pi-hole or the DNS64. But then I discovered several methods to combine Pi-hole with an external DNS64 service.
Introduction
To complete a NAT64 gateway, a DNS64 is really helpful. This kind of DNS server works exactly like a standard DNS server with one minor difference. If an AAAA record is missing for a domain, it forges one by using the the A records of that domain. Here is an example with the domain name ipv4.google.com:
user@computer:~$ dig +short ipv4.google.com AAAA
64:ff9b::d83a:d72e
user@computer:~$
The DNS64 replies 64:ff9b::d83a:d72e, it is the combination of the Well-Known prefix 64:ff9b:: and the IPv4 address 216.58.215.46.
About the Pi-hole server, it is also a DNS server but again with one minor difference. It provides an empty answer to queries about advertisement domains.
Having a combination of both Pi-hole and DNS64 features would be a really nice asset. This article describe two methods to get it.
Table of contents
How to ?
Method 1: with a public DNS64 server
This method is the simplest but also comes with a few limitations:
- The amount of provider is really limited, maybe none of them will fit your confidentiality policy
- These providers use the Well-Known prefix
64:ff9b::, so the local NAT64 gateway must be configured to use it too - These providers are only reachable through IPv6 internet, so the Pi-hole system must be installed on a computer having internet through IPv6
If your installation does not meet ALL these conditions, look at the second method.
Here is the list of DNS64 providers:
| Provider | DNS 1 | DNS 2 |
| 2001:4860:4860::64 | 2001:4860:4860::6464 | |
| Cloudflare | 2606:4700:4700::64 | 2606:4700:4700::6400 |
There are a few other DNS64 providers that answer AAAA records built with their own prefix. That means using their NAT64 gateway, I choose not to list them because the goal is to use a local NAT64 gateway not one of a private company.
After having picked a provider, follow the instruction in the section related to changing the upstream DNS into Pi-hole.
Method 2: with a Bind9 server
This method comes with no limitation and is highly configurable. But It is a bit more complex to deploy it. The idea is to combine a Bind9 server with a Pi-hole on the same host. With the DNS64 role assigned to Bind9 and Pi-hole using the Bind9 server as an upstream DNS server.
Step 1: installing Bind9
user@computer:~$ sudo apt install bind9
Reading package lists... Done
...
Setting up bind9 (1:9.11.5.P4+dfsg-5.1+deb10u2) ...
user@computer:~$
Step 2: configuring Bind9
The configuration of Bind9 is located in this file: /etc/bind/named.conf.options Here is a working example using the Well-Known prefix and the Google DNS servers as upstream servers.
acl localhost_only {
    ::1/128; 127.0.0.0/8;
};
acl rfc1918 {
    10/8; 192.168/16; 172.16/12;
};
options {
    directory "/var/cache/bind";
    forwarders {
        2001:4860:4860::8888;
        2001:4860:4860::8844;
    };
    dns64 64:ff9b::/96 {
        clients { localhost_only; };
        mapped { !rfc1918; any; };
        exclude { 64:ff9b::/96; ::ffff:0000:0000/96; };
    };
    listen-on port 1053 { 127.0.0.1/32; };
    listen-on-v6 port 1053 { ::1/128; };
    dnssec-validation auto;
};
If needed, change these settings to match your requirements.
Step 3: starting Bind9
user@computer:~$ sudo service bind9 start
user@computer:~$
Step 4: enabling Bind9
To be sure Bind9 will always be there even in case of reboot of the host.
user@computer:~$ sudo systemctl enable bind9
Synchronizing state of bind9.service with SysV service script with /lib/systemd/systemd-sysv-install.
Executing: /lib/systemd/systemd-sysv-install enable bind9

Created symlink /etc/systemd/system/multi-user.target.wants/bind9.service → /lib/systemd/system/bind9.service.
user@computer:~$
Step 5: testing Bind9
user@computer:~$ dig +short @::1 -p 1053 ipv4.google.com
64:ff9b::d83a:d06e
user@computer:~$
Once Bind9 is installed and configured, it has to be used as upstream DNS inside Pi-hole. See the next section to change the upstream DNS. The upstream DNS must have the value ::1#1053 and there is no need to set a secondary upstream server.
Changing upstream DNS into Pi-hole
Through the web interface
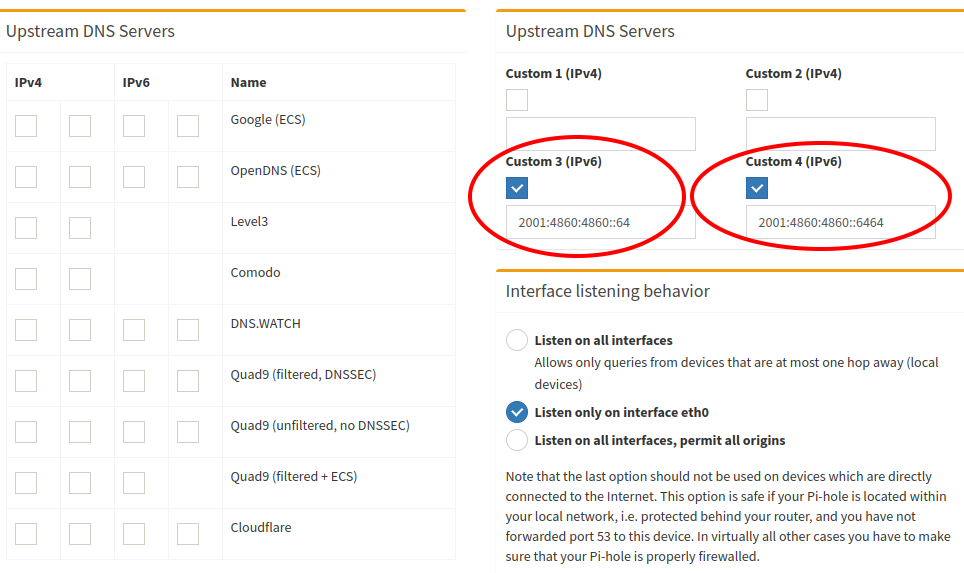
If the web interface is installed, this is the easiest way to change the upstream DNS servers. Go to the page /admin/settings.php?tab=dns and set the upstream DNS server through fields Custom 3 (IPv6) and Custom 4 (IPv6). Be sure everything else is unchecked.
Here is a screen capture of what it should like with Google DNS64 set as upstream servers:
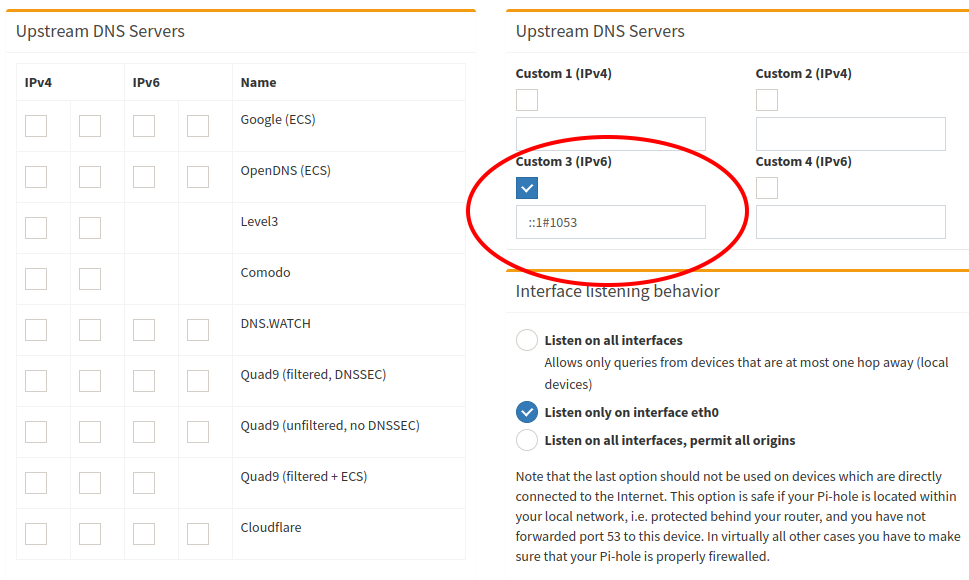
If using the Bind9 method, only fill the field Custom 3 (IPv6) with ::1#1053 and let everything else unchecked, it should look like this:
With the command line interface
Pi-hole is not really designed to be configured directly through its configuration files, but it is still possible to do it. Two files need to be modified.
Step 1: edit file /etc/dnsmasq.d/01-pihole.conf
If using public DNS64 servers, two server entries must be present into that file. Here is an example with Google DNS64 servers.
...
server=2001:4860:4860::64
server=2001:4860:4860::6464
...
With the bin9 method, only a single server entry should exist in the file and it must look like this:
...
server=::1#1053
...
Do not let empty server entry in the file.
Step 2: edit file /etc/pihole/setupVars.conf
This file use a different syntax, there is an index value in the variable names. If using public DNS64 server, a PIHOLE_DNS_1 entry and a PIHOLE_DNS_2 entry must be present into that file. Here is an example with Google DNS64 servers.
...
PIHOLE_DNS_1=2001:4860:4860::64
PIHOLE_DNS_2=2001:4860:4860::6464
...
With the Bind9 method, only the PIHOLE_DNS_1 entry should exist in the file and it must look like this:
...
PIHOLE_DNS_1=::1#1053
...
Do not let empty PIHOLE_DNS_ entry in the file.
Step 3: restart Pi-hole
user@computer:~$ sudo pihole restartdns
[sudo] password for pi:
  [✓] Restarting DNS server
user@computer:~$
Tests
This section contains several basic tests that show what must look like DNS records when using a Pi-hole through a DNS64. It allows to quickly spot any abnormal behaviour.
A domain with an existing AAAA record
user@computer:~$ dig +short google.com AAAA
2a00:1450:4007:807::200e
user@computer:~$
Depending where the test is made, the public IPv6 address could change, the important thing here is the address type. The returned address must be a Global Unicast Address.
A domain without any AAAA record
user@computer:~$ dig +short ipv4.google.com AAAA
ipv4.l.google.com.
64:ff9b::d83a:d72e
user@computer:~$
Again the last 8 hexadecimal characters could change a bit depending the location where the test is made. The important thing is to have an address starting with the Well-Known prefix.
A domain filtered by Pi-hole
user@computer:~$ dig +short doubleclick.net AAAA
::
user@computer:~$
This test allows to be sure that the answering DNS server is the Pi-hole and not another DNS server. The domain doubleclick.net is filtered by Pi-hole and that is why the address :: is returned. It is an IPv6 address full of zero.
Performance tests
Making performance tests on DNS servers is not easy, mainly because they use several cache systems. A first request to resolve a domain would be slow, but every other requests on the same domain are way faster because of the cache content. Luckily, both Pi-hole and Bind9 come with a way to clean their caches while running. The goal of performance tests is to get the average delay of the first request.
Pihole cleans its cache as soon as it receives a SIGHUP signal, it can be done with the following command:
sudo kill -1 "$(pgrep pihole-FTL)"Bind9 cache is simpler to clean, a command is provided to manage the DNS caching:
sudo rndc flushNow with these methods of cache cleaning, performance tests are possible. A dozen of query were made to the same domain with caches being always empty. Here are the average results for each method:
| Method | Delay |
| Direct (no Pi-hole, no Bind9, no DNS64) | 30ms |
| Pi-hole + classic upstream DNS server (no DNS64) | 40ms |
| Pi hole + DNS64 upstream DNS server (method 1) | 40ms |
| Bind9 alone | 110ms |
| Pi-hole + Bind9 (method 2 without DNSSEC) | 120ms |
| Pi-hole + Bind9 (method 2 with DNSSEC) | 280ms |
The average delay of the internet connexion used for these tests is aroung 30ms.
The hardware used is a Raspberry Pi 2, that could explains why it takes 10ms for a Pi-hole to process a request.
The huge delay added by Bind9 is really a bad surprise. DNSSEC mechanism also adds a lot of latency.
Conclusion
It is really nice to now have a Pi-hole with DNS64 support in the LAN. Still a bit confused by the lack of performance of Bind9 but it is acceptable if a custom configuration is needed.
Sources
- https://bind9.readthedocs.io/en/v9_16_6/reference.html#options-statement-definition-and-usage
- https://tools.ietf.org/html/rfc6147
- https://tools.ietf.org/html/rfc6052
- https://en.wikipedia.org/wiki/IPv6_transition_mechanism#DNS64
- https://developers.google.com/speed/public-dns/docs/dns64
- https://developers.cloudflare.com/1.1.1.1/support-nat64
- https://www.bortzmeyer.org/6147.html
- https://thepoulpe.net/index.php?article25/mise-en-place-d-un-reseau-ipv6-troisieme-partie
- https://www.oreilly.com/library/view/dns-and-bind/9781449308025/ch04.html
- https://linuxconfig.org/how-to-view-and-clear-bind-dns-server-s-cache-on-linux
- https://docs.pi-hole.net/ftldns/dns-cache/
- https://gist.github.com/mutin-sa/5dcbd35ee436eb629db7872581093bc5
No Comments, Be The First!